
Safety Eyes 101: Sizes, Tips, and Safe Alternatives for Toys
Focus keyphrase: safety eyes for amigurumi
You've spent hours crocheting your little plush. You've made the body, the ears, the arms, and now it's time for the final, magical step: giving it eyes. 👀 The eyes are the soul of an amigurumi toy, bringing its character to life. While you can use buttons or yarn, the most popular and professional-looking choice for your plush is safety eyes for amigurumi. But what exactly are they, how do you use them, and are they truly safe? This guide will teach you everything you need to know to give your creations a sparkling personality, safely. 💖
What Are Safety Eyes and Why Are They Important?
Safety eyes for amigurumi are small plastic eyes that come with a washer (or backing) that snaps onto the post of the eye from the inside of your project. The name "safety eyes" refers to the fact that they are much harder for a small child to pull off, significantly reducing the risk of a choking hazard. For this reason, they are the preferred choice for toys intended for older children. It's a crucial consideration for anyone gifting their creations to young ones, as a glued-on button or a loosely sewn piece could pose a serious risk. By using safety eyes, you can craft with confidence, knowing your handmade gifts are secure.
Choosing the Right Size: A Quick Guide
Choosing the right size of safety eye is crucial for achieving the perfect look. The wrong size can make your plush look surprised, angry, or just plain strange.
-
General Rule: A good rule of thumb is to choose a safety eye that is about 1/10th the size of your plush's head. For example, a 10cm head would look great with a 10mm eye.
-
When in Doubt, Trust the Pattern: Most amigurumi patterns will specify the exact size of the safety eyes needed. This is the easiest way to ensure a great result. For instance, our Yarniss Beginner Crochet Kit Bunny includes the perfect size eyes for the project, so you don't have to worry about the fit.
-
Testing: The best way to choose a size is to place the eyes on your plush's head and step back. Does the size look right? Is the expression what you had in mind? Experiment with different sizes before committing.
How to Securely Attach Safety Eyes
Attaching safety eyes for amigurumi is a simple but critical process. Take your time to get it right.
-
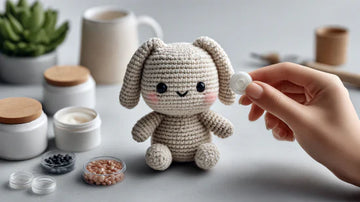
Step 1: Positioning 📍: Before you insert the eye, use a long, thin pin to mark the exact spot where you want the eyes to go. Check for symmetry by counting the number of stitches between them. Step back and look at your plush from all angles to make sure the placement is perfect.
-
Step 2: Insertion: Once you're sure about the placement, push the stem of the safety eye through the crocheted fabric from the outside to the inside. Be gentle to avoid stretching or distorting the stitches.
-
Step 3: Attaching the Washer 🔒: This is the most important part! From the inside of the plush, push the washer onto the stem of the eye. Push hard until you hear a clear "click." The washer should be on tight and not move. A good test is to try and push the eye out from the front. If it's secure, it should not move.
-
Step 4: A Final Check: After both eyes are in, give them one last good tug to ensure they are locked. To see this process in action, check out the tutorials in our amigurumi blog section.
The Ultimate Guide to Safe Alternatives
While safety eyes for amigurumi are great for children over three, they are not recommended for infants and toddlers who may chew on the toy. For these precious little ones, a safer alternative is necessary.
-
Embroidered Eyes: This is the safest option for baby toys. Use black or brown yarn and a tapestry needle to embroider the eyes directly onto the plush. You can create a simple French knot or a few straight stitches for a classic, cute look. This is a great skill to practice with our Yarniss Beginner Crochet Yarn.
-
Felt Eyes: You can cut small circles or ovals from felt and securely sew them onto your plush. Use a strong thread and make sure your stitches are tight to prevent any pieces from coming loose.
Final Pro Tips for Perfect Eyes
-
Symmetry is Key: The easiest way to get symmetrical eyes is to count the stitches. Don't eyeball it!
-
Placement of the Nose/Mouth: I'll mention how the eyes and nose work together to create the toy's expression.
-
Consider the Pattern: I'll advise them to follow the pattern's instructions closely.
-
Safety First: I'll re-emphasize that safety is the top priority, especially for children under three.
-
A Final Tip: I'll mention that having the right tools, like a good ergonomic hook, makes the amigurumi process easier. I'll link to the Yarniss Large Ergonomic Crochet Hooks Set and the
Yarniss crochet kitpage.
Conclusion
The journey of creating an amigurumi toy is all about the little details. Having the right tools, including a comfortable ergonomic hook, can make the process much smoother. Our Yarniss crochet kit is perfect for achieving the tight stitches needed for amigurumi.
Ready to find the perfect kit for your next creation? Explore our full range of crochet kits and start crafting! 💖


